An Attempt to Update moebooru Engine

If you didn’t know, the current moebooru running on oreno.imouto is using ancient version of many things. It also uses a custom lighty module (mod_zipfile) which doesn’t seem to be available anywhere.

I’ve updated it with latest Rails 2.x and made it compatible with nginx. Mostly. You can see it running here.

The plans:

  • Upgrade to Ruby 1.9.
  • Update all plugins.
  • Update anything deprecated.
  • Migrate to Bundler.
  • Use RMagick instead of custom ruby-gd plugin.
  • Use RMagick instead of calling jhead binary.
  • And more!

We’ll see if I can actually finish this one. Grab the source here. Yeah, I’m using Mercurial for a Rails project.

nginx – gzip all the text

During my migration to other server, I recreated some of my configs and enabled gzip compression for most file types. Here’s the relevant config:

gzip on;
gzip_vary on;
gzip_disable "msie6";
gzip_comp_level 6;
gzip_proxied expired no-cache no-store private auth;
gzip_types text/plain text/xml application/xml application/json application/x-javascript text/javascript text/css;

It should cover most text-based content one will ever serve over the web. Probably.

On Comment System

I just migrated to Disqus – a fully managed comment system for websites. I saw it first used in Engadget. It didn’t work quite good at the time (or at least I didn’t have good memory on it) but it’s quite wonderful now.

One of the problem I’m having when leaving comment on other blogs is it’s difficult to track which posts and sites I’ve left a comment on. Some sites (like this site used to be) provide “Notify via E-mail on Replies” option but it’s clunky at best and with dozens, hundreds of sites out there it’s quite impossible to track them all. Not to mention you have to visit each blogs to unsubscribe from notification.

Then come Disqus – it’s a centralized comment system which allows any website to use their service and let the users enjoy one-stop interface to manage all their comments on various websites. It uses JavaScript to embed the comment interface on a page – not the best way but I guess it’s acceptable now with emergence of smartphones and tablets which actually capable of rendering JS.

Replacing WordPress’ comment system with Disqus is quite easy. The official WordPress plugin provides everything to migrate comments quickly and easily. It can even keep the comments synced with local database – allowing quick way out in case Disqus goes evil™.

I doubt anyone still read this blog (and blog is so 2009) but well, here it is.

nginx/php single config for SSL and non-SSL connection

This morning I noticed I haven’t upgraded WordPress MU Domain Mapping plugin to the latest version. It supposedly brings better SSL support. And after upgrading I couldn’t log in to my mapped domain blogs (e.g. this blog). Wasn’t it a great way to start my morning?

After some digging, I found out the problem was because I don’t have one PHP(?) parameter – HTTPS – passed properly. It should set to True whenever one is using SSL connection otherwise there’s no way the PHP process can know if the connection is secure or not. Previous version of WPMUDM have a bug in which skips SSL check but in turn enables using HTTPS even without such parameter. Decided it’s my fault (I believe it would completely breaks phpMyAdmin), adding the parameter then I did.

But it’s not that simple: I’m using unified config for both my SSL and non-SSL connection’s PHP include. Splitting the config would make the duplication worse (it’s already relatively bad as it is) so that’s not an option. Using the evil if is also not a solution since it doesn’t support setting fastcgi_param inside it.

Then the solution hit me. The map module – a module specifically made for things like this and to avoid usage of if. I tested it and indeed worked as expected.

Here be the config:

...
http {
  ...
  map $scheme $fastcgi_https {
    https 1;
    default 0;
  }
  ...
  server {
    ...
    location ~ .php$ {
      ...
      fastcgi_param HTTPS $fastcgi_https;
    }
...

And WordPress MU Domain Mapping is now happy.

Update 2012-02-20: nginx version 1.1.11 and up now have $https variable. No need to have that map anymore.

Compiling PuTTY for Windows

Because of one awesome bug inflicts eye-cancer when using Consolas font and deactivated “Bold text is a different colour”, I had to recompile PuTTY by hand (more like, by gcc). I initially tried to compile the PuTTYTray one but apparently they successfully mixed C and C++ code and completely broke the build procedure using mingw. Or I missed something obvious.

Anyway, I went back to vanilla PuTTY. As it turns out, compiling using latest mingw’s gcc isn’t a good idea since it removed -mno-cygwin option and therefore broken unless you do some magic edit. Thanks to that, I stopped bothering trying to compile it under Windows and used mingw-gcc for Linux (which is able to produce Windows binary). Here be the steps from beginning. Tested on Debian 6.

apt-get install mingw32 subversion perl
svn co svn://svn.tartarus.org/sgt/putty putty
cd putty
perl mkfiles.pl
cd windows
make VER="-DSNAPSHOT=$(date '+%Y-%m-%d') -DSVN_REV='$(svnversion)' -DMODIFIED" TOOLPATH=i586-mingw32msvc- -f Makefile.cyg putty.exe

Patch is done before make (duh) and the diff can be found here. If you’re lazy (like me) you can just download the build at my server (link at bottom). Should be virus-free but I guess you can notify me if you encounter one. Built everyday until it breaks.

  • exe: the program
  • sha512: hash of the program
  • zip: both program and its checksum

[ exe | sha512 | zip ]

WordPress Multisite with nginx (subdomain/wildcard domain ver.)

WordPress Multisite, previously known as WordPress MU (Multi User), is an application which allows hosting multiple WordPress blogs with just one installation. Instead of creating copies of WordPress for each users’ blogs, one can use one installation of Multisite to be used by multiple users, each with their own blogs. Personal/custom domain is also possible as used for this blog (this blog’s master site is genshiken-itb.org). Too bad, the official documentation only provided guide for installing on Apache. If you haven’t known, I usually avoid Apache – I simply more proficient with nginx. Of course, this blog is also running on nginx therefore it’s perfectly possible to run WordPress Multisite on nginx.

At any rate, reading the official documentation is still a must and this post will only cover the nginx version of Apache-specific parts (namely Apache Virtual Hosts and Mod Rewrite and .htaccess and Mod Rewrite) and only for subdomain install. Subdirectory one will or will not follow some time later.

Assuming you have working nginx and php-cgi (with process manager like php-fpm or supervisord), for starter you’ll want to create a specific file for this WP install. Let’s say this file named app-wordpress.conf. Obviously you have put WordPress installation somewhere in your server. In this example I put the files in /srv/http/genshiken-itb.org/.php/wordpress. Its content:

client_max_body_size 100m;
root /srv/http/genshiken-itb.org;
location /. { return 404; }
location / {
  root /srv/http/genshiken-itb.org/.php/wordpress;
  index index.php;
  try_files $uri $uri/ /index.php?$args;
  rewrite ^/files/(.*) /wp-includes/ms-files.php?file=$1;
  location ~ .php$ {
    try_files $uri =404;
    fastcgi_pass unix:/tmp/php-genshiken.sock;
    fastcgi_read_timeout 600;
    fastcgi_send_timeout 600;
    fastcgi_index index.php;
    fastcgi_param SCRIPT_FILENAME $request_filename;
    include fastcgi_params;
  }
}

Simple enough. Actually, it’s exact same with normal WordPress install except one extra line:

rewrite ^/files/(.*) /wp-includes/ms-files.php?file=$1;

And you’re set. Note that I set fastcgi timeouts higher than default to work around the slow performance of Amazon EC2 Micro Instance. Should only needed on network upgrade and massive blog import.

Anyway, in your main nginx.conf file, put:

server {
  listen 80;
  server_name *.genshiken-itb.org;
  include app-wordpress.conf;
 }

In proper place. The usefulness of separate file for WordPress configuration will become apparent once you want to tweak performance for some blogs. I’ll explain that later if I feel like to.
Solaris 10 Patch Where?

If you haven’t noticed, Solaris 10 is not available for free anymore. At least the patches. It’s Oracle after all.

Security patches were originally available for free when Sun stil exists but not anymore now. From PCA site:

Unlike before, even security patches are not available for free anymore.

So you’re screwed if you don’t have one. You’re better off installing OpenIndiana instead.

In case you’re one of the lucky folks (like me /hahahaha) having office Oracle account with Solaris support contract, I suggest checking out PCA to ease up installing patches. Also make sure to install it through OpenCSW for easiest update method.

User Management in Solaris 10

We’re back with Solaris 10 administration series. This time, it’s the user management part.

Securing the Password

For God knows why reason (probably legacy), the default password hashing algorithm in Solaris 10 is the classic UNIX DES hashing. To change it, edit /etc/security/policy.conf and find line starting with CRYPT_DEFAULT and change it to this:

CRYPT_DEFAULT=2a

(you can also set to other value but 2a should be good enough)

And to change the root password, first edit /etc/shadow and append $2a$ to the 2nd (password) field like this:

root:$2a$afgfdg....:...

or else chaning the root password using passwd won’t be set using the newly configured algorithm.

Creating User

First of all remember that there’s character limit of 8 for username in Solaris. Linux doesn’t have this but it’ll break ps (displaying UID instead of username). Also creating directory in /home is not possible because of several reasons. The proper way is to create home directory somewhere and create relevant entry in /etc/auto_home.

useradd -s /bin/bash newuser
mkdir -p /export/home/newuser
chown newuser:staff /export/home/newuser
printf "%st%sn" "newuser" "localhost:/export/home/newuser" >> /etc/auto_home
passwd newuser

This will let Solaris to automount (loopback filesystem/lofs) the actual directory (in this case /export/home/newuser) to /home.

Of course you can set the directory somewhere else, though having home not in /home feels weird.

Networking in Solaris 10

Since *BSD is getting boring, I decided to try an old but largely used enterprise OS: Solaris 10. I’m trying the latest update so it’s got ZFS and all the bling.

Anyway, I’m posting this so I can find this again whenever I need to.

Hostname/DNS

Here be hostname: /etc/nodename. Don’t forget to add relevant entries to /etc/hosts. And while at it, don’t forget to add loghost to 127.0.0.1 on hosts entry. Don’t forget to set /etc/nsswitch.conf with content of /etc/nsswitch.dns since unless you know what you’re doing, that’s what you want.

Static IPv4

/etc/hostname.if. Fill in with relevant IP address.

Static IPv4 Default Route

/etc/defaultrouter. Fill in with relevant default gateway’s IP address

Static IPv6

/etc/hostname6.if. Fill in with IPv6 address in following format:

addif some:ipv6:add::ress/prefixlen up

Also disable service for network discovery protocol (IPv6 routing etc autoconfiguration) by issuing

/usr/sbin/svcadm disable routing/ndp

Or not. It’s an undead zombie. Just add that line to /etc/rc3.d/S99rclocal (or create the file and make it executable if it isn’t there yet) to really kill the service upon boot.

Static IPv6 Default Route

It’s buried in /etc/inet/static_routes. Modified using route -p. Execute this for setting default IPv6 route:

route -p add -inet6 default de:fa:ult::gw

And that’s about it. It’s more or less same in Solaris 11 but you need to disable physical:nwam service in there. Also there’s ipadm but I think it’s still pretty much a black magic.

DHCP

For DHCP/dynamic, it is much easier:

touch /etc/hostname.if
touch /etc/hostname6.if
touch /etc/dhcp.if

no-www for nginx

If you happen to be in no-www camp and want to redirect people accessing www.whateverdomain.com to the no-www version but have lots of domain, instead of writing one by one and you’re not keen in using config generator (I’m not), you can use this:

server {
  listen 80;
  listen [::]:80 ipv6only=on;
  server_name ~^www.(?<domain>.+)$;
  rewrite ^ $scheme://$domain$request_uri? permanent;
  access_log /var/log/nginx/access-no_www.log;
}

Remove listen [::]:80 ipv6only=on; if you’re not using IPv6 and adjust the log file path to wherever you want (or just turn off or remove it altogether).

Note that this trick doesn’t work well with HTTPS/SSL domains since you’ll get big fat warning about incorrect domain name in certificate or about self-signed certificate if you’re using wildcard one.

Announcing ecos – the collection of crappy scripts I wrote

Included in the package:

  • bash initialization script, mainly tested on OpenIndiana but should also good for Linux, *BSD and other *nix
  • tcsh initialization script. Mainly tested on FreeBSD
  • my hgrc. Obviously shouldn’t be used as is except if you want to give me the copyright of whatever you’re committing
  • tmux config. Blue bars instead of green. And minor tweaking
  • vimrc. Guaranteed to break vim-lite or whatever the default vi in Ubuntu. Also shouldn’t be used for most administrative task where tab should be tab and it should be 8 spaces long. Mainly for ruby development.
  • inputrc. Makes various application using readline much more awesome – especially if you’re not emacs user
  • Various scripts:
    • cek: check crc32 of a file and compares with the one in filename if exists. Useful for checking downloaded anime. Requires ruby
    • ed2k: generates ed2k link of a file. Useful for comparing against anidb database. Ruby is required.
    • putcrc: as the name says, puts crc32 of the file in its filename. Also requires ruby.
    • ren: rename anime files with whatever I like. In perl. Contains hundres of regexes. No test so it tends to break at unfortunate time.

Grab them here: [ bitbucket/edogawaconan/ecos ]

Audio volume control from shell in OpenIndiana

I might be missing something but the volume control for OpenIndiana is a bit lackluster in display department compared to FreeBSD’s. In FreeBSD, whenever I do a volume change I get to see the values; before and after – but not in OpenIndiana; its default shell-based mixer quite sucks and doesn’t give enough feedback whenever I change volume.

There’s a good reason I keep bash as my main shell – I can script in POSIX sh and keep the sane shell at the same time (as opposed to using actual POSIX sh). So here’s the function I recently created; when given no parameter will display current volume and when given one parameter will change the volume and display how the change goes.

vol() {
getvol() { audioctl show-control volume | awk ‘/^volume/ { print $2 }’; }
printf “%s: ” “Volume”
if [ -n “$1” ]; then
printf “%s => ” “$(getvol)”
audioctl set-control volume “$1”
fi
printf “%sn” “$(getvol)”
}

It should be pretty much POSIX but remember that it will only work in Solaris Express 11 (probably) and OpenIndiana (tested with oi_148).

Solaris zones’ (first) boot error

If you encounter error like this on first zone boot:

SunOS Release 5.11 Version oi_148 64-bit                                        
Copyright (c) 1983, 2010, Oracle and/or its affiliates. All rights reserved.    
svc.configd: Fatal error: "boot" backup failed: rename(/etc/svc/repository-boot-tmpHSa4Hq, /etc/svc/repository-boot-20110427_123458): Permission denied         
svc.configd: Fatal error: unable to create "boot" backup of "/etc/svc/repository.db"                                                                            
Loading smf(5) service descriptions: 98/98                                      
svc.configd: Fatal error: "manifest_import" backup failed: rename(/etc/svc/repository-manifest_import-tmpJSa4Hq, /etc/svc/repository-manifest_import-20110427_123527): Permission denied                                                        
svc.configd: Fatal error: Backend copy failed: rename /etc/svc/repository.db-KSa4Hq to /etc/svc/repository.db: Permission denied                                
svc.configd: Fatal error: Backend copy failed: remove /etc/svc/repository.db-KSa4Hq: Permission denied                                                          
Requesting System Maintenance Mode                                              
(See /lib/svc/share/README for more information.)                               
svc:/system/early-manifest-import:default exited with status 95                 
                                                                                
Enter user name for system maintenance (control-d to bypass):

Check your zfs setting, particularly nbmand and atime parameter. I myself set nbmand to off and atime to on for the zones’ zfs filesystem and it booted fine.

mplayer2 on openindiana

Some points:

  • Yes, it’s doable. Use mplayer2-build helper
  • You have to install many things (mainly autotools and don’t forget system audio header). Also yasm from opencsw
  • With regard to autotools, you have to create symlink for few things and put it somewhere in your PATH, preferably before everything else (namely ginstall -> install, aclocal-1.10 -> aclocal, automake-1.10 -> automake)
  • Add –cc=gcc to common_options

Probably there are some more but that’s all I can remember right now. Should also applicable for opensolaris (why are you still using it) and Solaris Express 11.

If you want to enable SSE support, you have to apply some patches to mplayer.

If you want to use vdpau while using nvidia’s latest driver, you have to install libvdpau.

danbooru for windows

😆

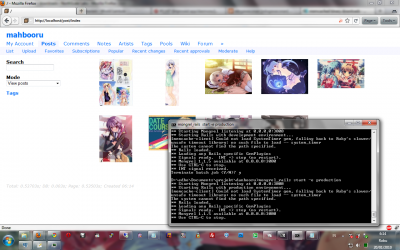
This morning I randomly decided to try installing danbooru on Windows (7-x64). And indeed it works. Mostly.

Using mongrel and nginx since unicorn is not available on Windows.

Few things to note:

* system_timer is missing since I can’t seem to install it. Probably need to try ruby19 or ruby18-1.8.6-p27 (currently using ruby18-1.8.6-p383)
* manual initial database initialization since the script I made is specifically for *nix systems
* compiling danbooru_image_resizer is… *fun*
* for whatever reason I can’t install mongrel_service
* apparently there’s something missing. Or broken. Or both – there’s message “The system cannot find the path specified.” every time I start mongrel and do migrate

…anyone interested trying this on production server? 😛

_Last update 2011-07-18 21:01: formatting, also added rewrite rule for nginx to cope with uploaded media path change_

Secure password, version 2

There’s this link for tutorial how to create secure and easy to remember passwords.

More or less it’s the same as the one I posted months ago, just now with character-to-symbol replacement method. Reducing the need to create unnecessary long sentence to get symbols etc.

[ [Read](http://kylehasegawa.com/content/the-perfect-password-plan) | [My old post](https://blog.myconan.net/posts/222) ]

_Last update 2011-07-11 10:31: markdown-fied, fixed link, added tags and categories_

nginx/php 404 proper handler

If you find “No file specified” error message disturbing (as I did), here’s the configuration to remove it!

location ~ .php$ {
try_files $uri =404;
include /etc/nginx/fastcgi_params;
fastcgi_pass 127.0.0.1:55555;
fastcgi_index index.php;
fastcgi_param  SCRIPT_FILENAME    $request_filename;
}

Don’t use `if (-f $request_filename)` – it won’t work and if is evil. Also the `try_files` will ensure that the file actually exists – effectively disabling possible vulnerability with public file upload on certain conditions.

_Last update 2011-07-10 20:16: working version, markdown-fied_

Easy way to create rather secure and easy to remember password

Long title is looooooooooooong. LOL.

The steps:

* Create (long) sentences (usually two) that’s easy to remember and contains numbers and symbols (ex: I have smartly bought & waste money on manga that the anime has just aired this season, Zettai Karen Children, for $10. It’s a good read though!)
* Take first letter of each words, except for numbers and symbols (from above: Ihsb&wmomttahjats,ZKC,f$10.Iagrt!)
* That’s it, LOL. (and the example above is too long. 2 sentences with 5 word each should be sufficient 😛 )

Last update 2011-07-11 10:32: markdown-fied, tagged and categorized